Using Packages and Channels
Overview
Teaching: 20 min
Exercises: 10 minQuestions
What are Conda packages?
What are Conda channels?
Why should I be explicit about which channels my research project uses?
What should I do if a Python package isn’t available via a Conda channel?
Objectives
Install a package from a specific channel.
Understand how conda channels work.
Use pip to install a package into your environment.
What are Conda packages?
A conda package is a compressed archive file (.tar.bz2) that contains:
- system-level libraries
- Python or other modules
- executable programs and other components
- metadata under the
info/directory - a collection of files that are installed directly into an
installprefix.
Conda keeps track of the dependencies between packages and platforms; the conda package format is identical across platforms and operating systems.
Package Structure
All conda packages have a specific sub-directory structure inside the tarball file. There is a
bin directory that contains any binaries for the package; a lib directory containing the
relevant library files (i.e., the .py files); and an info directory containing package metadata.
For a more details of the conda package specification, including discussions of the various
metadata files, see the [docs][conda-pkg-spec-docs].
As an example of Conda package structure consider the Conda package for
the RNA-Seq transcript quantification package salmon targeting a 64-bit Linux, salmon-1.4.0-h84f40af_1.tar.bz2.
.
├── bin
│   └── salmon
├── info
│   ├── about.json
│   ├── files
│   ├── git
│   ├── hash_input.json
│   ├── has_prefix
│   ├── index.json
│   ├── licenses
│   │   └── LICENSE
│   ├── paths.json
│   ├── recipe
│   │   ├── 0.14.2-1
│   │   │   ├── build.sh
│   │   │   └── meta.yaml
│   │   ├── build.sh
│   │   ├── conda_build_config.yaml
│   │   ├── meta.yaml
│   │   ├── meta.yaml.template
│   │   └── run_test.sh
│   ├── repodata_record.json
│   └── test
│       ├── run_test.sh
│       └── sample_data.tgz
└── lib
    ├── graphdump
    │   ├── graphdump-targets.cmake
    │   └── graphdump-targets-release.cmake
    ├── libgraphdump.a
    ├── libntcard.a
    ├── libsalmon_core.a
    ├── libtwopaco.a
    ├── ntcard
    │   ├── ntcard-targets.cmake
    │   └── ntcard-targets-release.cmake
    └── twopaco
        ├── twopaco-targets.cmake
        └── twopaco-targets-release.cmake
Conda packages cache directory (pkgs_dirs)
When you first install a package, conda will download the tar.bz2 packages into the package cache directory. Before conda install a package it will look in the package directory . By default this will be placed under ~/.conda/pkgs.
For Anaconda 5.0.1 and newer, you can also configure your pkgs directory location by using the following command:conda config --add pkgs_dirs <package directory>
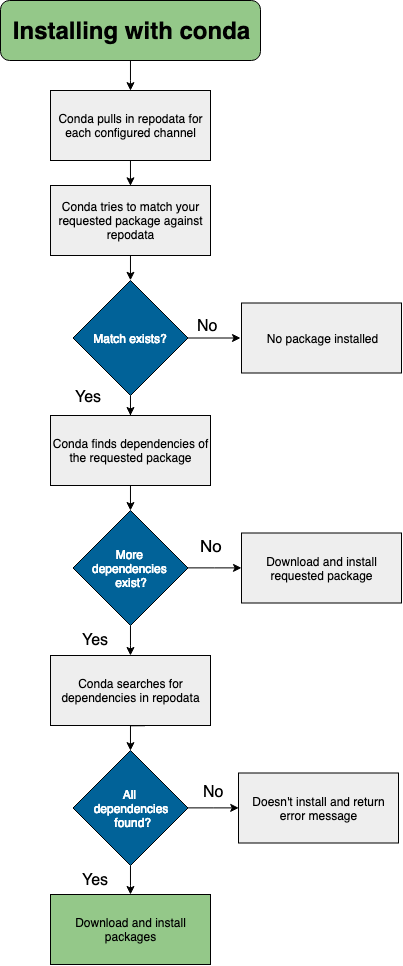
What actually happens when I install packages?
During the installation process, files are extracted into the specified environment (defaulting to the current environment if none is specified). Installing the files of a conda package into an environment can be thought of as changing the directory to an environment, and then downloading and extracting the package and its dependencies.
For example, when you conda install a package that exists in a known repository (channel), and has no dependencies,
conda does the following.
- looks at your configured channels (in priority)
- reaches out to the repodata associated with your channels/platform
- parses repodata to search for the package
- once the package is found, conda pulls it down and installs
The conda documentation has a nice decision tree that describes the package installation process.
Channel
Let’s create a new environment basic-rnaseq-env and install a transcript quantification package, salmon , for an RNA-Seq analysis project.
$conda create --name basic-rnaseq-env salmon
This will return;
Loading channels: done
No match found for: salmon. Search: *salmon*

PackagesNotFoundError: The following packages are not available from current channels:

  - salmon

Current channels:

  - https://repo.anaconda.com/pkgs/main/linux-64
  - https://repo.anaconda.com/pkgs/main/noarch
  - https://repo.anaconda.com/pkgs/r/linux-64
  - https://repo.anaconda.com/pkgs/r/noarch

To search for alternate channels that may provide the conda package you're
looking for, navigate to

    https://anaconda.org

and use the search bar at the top of the page.
What does packages are not available from current channels: mean?
What are Conda channels?
When you install or search for a package in conda it searches for it in remote repositories called channels. These remote channel are URLs to directories containing conda packages. By default the conda search command searches a set of channels defined here.
Anaconda Cloud channels.
main: The majority of all new Anaconda, Inc. package builds are hosted here. Included in conda’s defaults channel as the top priority channel.r: Microsoft R Open conda packages and Anaconda, Inc.’s R conda packages. This channel is included in conda’s defaults channel. When creating new environments, MRO is now chosen as the default R implementation.
Collectively, the Anaconda managed channels are referred to as the defaults channel because, unless otherwise specified, packages installed using conda will be downloaded from these channels.
My package isn’t available on the defaults channel! What should I do?
As was the case with salmon it may very well be the case that packages (or often more recent versions of packages!) that you need to install for your project are not available on the defaults channel. In this case you should search for alternate channels that may provide the conda package you’re looking for, To do this you should first navigate to
https://anaconda.org
and use the search bar at the top of the page. If we search for salmon we will se it is available via a channel called bioconda.
bioconda
Bioconda is a channel, maintained by the Bioconda project, specialising in bioinformatics software. Bioconda contains 1000’s of bioinformatics packages ready to use with conda install.
R and Bioconductor packages Most R packages on CRAN should be submitted at Conda-Forge. However, if the CRAN package has a Bioconductor, a repository for bioinformatics R packages, dependency, it belongs in Bioconda. If the CRAN package does not have a Bioconductor package dependency, it belongs in Conda-Forge.
conda-forge
In addition to the default channels that are managed by Anaconda Inc., there is another channel called Conda-Forge that also has a special status. The Conda-Forge project “is a community led collection of recipes, build infrastructure and distributions for the conda package manager.”
There are a number of reasons that you may wish to use the conda-forge channel instead of the defaults channel maintained by Anaconda:
- Packages on
conda-forgemay be more up-to-date than those on thedefaultschannel. - There are packages on the
conda-forgechannel that aren’t available fromdefaults. - You may wish to use a dependency such as
openblas(fromconda-forge) instead ofmkl(fromdefaults).
How do I search for a package from a specific channel?
If you know the channel your package is likely to be located on, you can can use the conda search
command with the --channel option and the name of the channel. E.g.
$ conda search --channel bioconda salmon
Loading channels: done
# Name                       Version           Build  Channel
salmon                         0.5.1               0  bioconda
salmon                         0.6.0               0  bioconda
...[truncated]...
salmon                         1.3.0      hf69c8f4_0  bioconda
salmon                         1.4.0      h84f40af_1  bioconda
salmon                         1.4.0      hf69c8f4_0  bioconda
salmon                         1.5.0      h84f40af_0  bioconda
How do I install a package from a specific channel?
If you know the channel your package is available from you can install a package from a specific channel into the currently activate environment by passing the --channel or -c option to the conda install command as follows.
$ conda create --name basic-rnaseq-env
$ conda activate basic-rnaseq-env
$ conda install --channel bioconda salmon
You can also install a package from a specific channel into a named environment (using --name or -n) or into an environment installed at a particular prefix (using --prefix or -p). For example, the following command installs the salmon package from the bioconda channel into the environment called basic-rnaseq-env which we created earlier.
$ conda install salmon --channel bioconda --name basic-rnaseq-env
This command would install salmon package from bioconda channel into an environment
installed into the env/ sub-directory.
$ conda install salmon --channel bioconda --prefix ./env
You may have noticed that we didn’t manage to install the latest version fo salmon, why?
The bioconda channel contains bioinformatics packages (salmon, STAR, samtools, DESeq2, etc.), however the channel conda-forge has most of the dependencies (numpy, scipy, zlib, CRAN packages, etc.) needed. Therefore we need to specify multiple channels to install the latest version.
Specify multiple channels
To specify multiple channels for installing packages by passing the --channel argument
multiple times.
$ conda install salmon=1.5 --channel conda-forge --channel bioconda --name basic-rnaseq-env
This also works when install multiple packages.
$ conda install fastqc=0.11 multiqc=1.10 --channel conda-forge --channel bioconda --name basic-rnaseq-env
Specifying channels when installing packages
Create a new directory called
rnaseq-projectand then create an environment in a sub-directory calledenv/with the the packages salmon=1.5, fastqc=0.11 and multiqc=1.11.Solution
In order to create a new environment you use the
conda createcommand as follows.cd ~/ mkdir rnaseq-project cd rnaseq-project/ conda create --prefix ./env --channel conda-forge \ --channel bioconda \ salmon=1.5 \ fastqc=0.11 \ multiqc=1.11Hint: For the lazy typers: the
--channelargument can also be shortened to-c, for more abbreviations, see also the Conda command reference .
Alternative syntax for installing packages from specific channels
There exists an alternative syntax for installing conda packages from specific channels that more explicitly links the channel being used to install a particular package.
$ conda install biconda::multiqc --prefix ./envInstall the latest version of the workflow manager nextflow using this alternative syntax
Solution
One possibility would be to use the
conda createcommand as follows.$ conda install --prefix ./env --channel conda-forge bioconda::nextflow
Channel priority
Different channels can have the same package, so conda must decide which channel to install the package from. Conda channels have a priority hierarchy.
By default, conda prefers packages from a higher priority channel over any version from a lower priority channel.
Conda collects all of the packages with the same name across all listed channels and processes them as follows:
-
Sorts packages from highest to lowest channel priority.
-
Sorts tied packages—packages with the same channel priority—from highest to lowest version number. For example, if channelA contains NumPy 1.12.0 and 1.13.1, NumPy 1.13.1 will be sorted higher.
-
Sorts still-tied packages, packages with the same channel priority and same version, from highest to lowest build number. For example, if channelA contains both NumPy 1.12.0 build 1 and build 2, build 2 is sorted first. Any packages in channelB would be sorted below those in channelA.
-
Installs the first package on the sorted list that satisfies the installation specifications.
Note: Channel priority listed on the command decreases from left to right. So if you were to install base R r-base using the command below.
$ conda create --name rproject-env --channel defaults --channel conda-forge r-base
The first channel defaults would have a higher priority than the second conda-forge. This is true even, if the version number of the package is higher in the second channel.
Note: The bioconda team suggests that the conda-forge channel be a higher priority than the bioconda channel.
A Python package isn’t available on any Conda channel! What should I do?
If a Python package that you need isn’t available on any Conda channel, then you can use the default Python package manager Pip to install this package from PyPI. However, there are a few potential issues that you should be aware of when using Pip to install Python packages when using Conda.
First, Pip is sometimes installed by default on operating systems where it is used to
manage any Python packages needed by your OS. You do not want to use this pip to
install Python packages when using Conda environments.
(base) $ conda deactivate
$ which python
/usr/bin/python
$ which pip # sometimes installed as pip3
/usr/bin/pip
Second, Pip is also included in the Miniconda installer where it is used to install and
manage OS specific Python packages required to setup your base Conda environment. You
do not want to use this pip to install Python packages when using Conda environments.
$ conda activate
(base) $ which python
~/miniconda3/bin/python
$ which pip
~/miniconda3/bin/pip
Another reason to avoid installing packages into your
baseConda environmentIf your
baseConda environment becomes cluttered with a mix of Pip and Conda installed packages it may no longer function. Creating separate conda environments allows you to delete and recreate environments readily so you dont have to worry about risking your core Conda functionality when mixing packages installed with Conda and Pip.
If you find yourself needing to install a Python package that is only available via Pip, then
you should first install pip into your Conda environment and then use that pip to install
the desired package. Using the pip installed in your Conda environment to install Python packages
not available via Conda channels will help you avoid difficult to debug issues that frequently
arise when using Python packages installed via a pip that was not installed inside you Conda
environment.
Conda (+Pip): Conda wherever possible; Pip only when necessary
When using Conda to manage environments for your Python project it is a good idea to install packages available via both Conda and Pip using Conda; however there will always be cases where a package is only available via Pip in which case you will need to use Pip. Many of the common pitfalls of using Conda and Pip together can be avoided by adopting the following practices.
- Always explicitly install
pipin every Python-based Conda environment.- Always be sure your desired environment is active before installing anything using
pip.- Prefer
python -m pip installoverpip install; never usepipwith the--userargument.
Installing packages into Conda environments using
pippandas pandas is a fast, powerful, flexible and easy to use open source data analysis and manipulation too
Activate the conda environment ` python3-env
and usepipto installpandas`.Solution
The following commands will activate the ` python3-env
and install the python data analysis librarypandas`.$ conda activate python3-env ( python3-env) $ conda install pip ( python3-env) $ python -m pip install pandasFor more details on using
pipsee the official documentation.
Key Points
A package is a tarball containing system-level libraries, Python or other modules, executable programs and other components, and associated metadata.
A Conda channel is a URL to a directory containing a Conda package(s).
You can specific a conda channel using the option
--channelor add it to your.condarcIf a python package isn’t available on a conda channel you can install it into your environment using the python package installer
pip.